Today’s ABAP lesson is a continuation of our previous exercise on creating a custom Z-table in SAP. If you haven’t completed that lesson, please check it out first, as we will be using the table from that exercise. However, if you’re already familiar with creating custom tables in SAP, let’s jump straight into the tutorial.
Tutorial Objectives
1. Know how to declare an internal table for the transparent table
2. Learn how to CREATE new entry, READ entry, UPDATE and DELETE entry in the transparent table
After creating your first custom table in SAP, it’s time to perform some basic database operations such as adding or creating entries, reading the records, updating them, and deleting records. These operations, commonly known as CRUD (Create, Read, Update, Delete), are essential for managing data in your custom table.
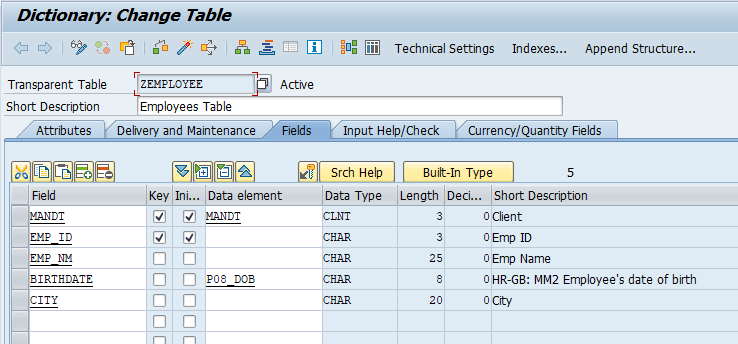
In the previous lesson we created an employees table called ZEMPLOYEE. Which consists of 4 fields ( EMP_ID, EMP_NM, BIRTHDATE, CITY ) with MANDT and EMP_ID as the primary keys as shown below.
Now let’s start the first database operation which creating new entries into the custom table.
How To Create New Entries To Your Custom ZTable in ABAP
A table consists of records, where each record represents a single row of data. To work with these records in ABAP, we need to declare two variables: a structure (or line type) to represent individual records and a table type to hold multiple records.
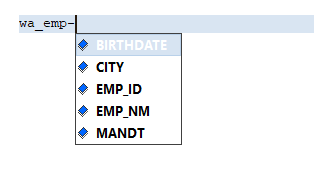
Next, we need to declare it_temp with the TABLE TYPE OF ZEMPLOYEE. It_emp will serve as our internal table to store employee records. Additionally, we’ve defined wa_emp as the working area, which refers to the structure of ZEMPLOYEE and is used to handle individual record.
DATA: it_emp TYPE TABLE OF zemployee,
      wa_emp TYPE zemployee.
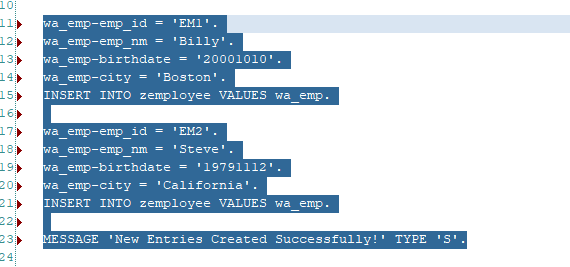
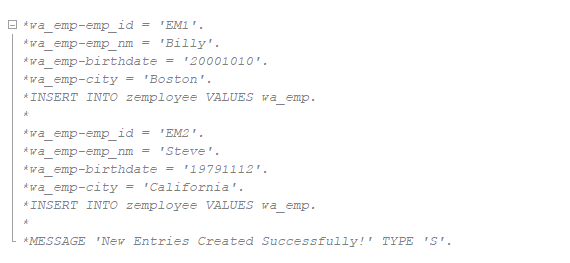
Now you’re ready to assign values for your first record.
TIPS: After typing wa_emp-, press CTRL+ SPACE to display all the available fields in your structure
Save and Activate the program. You will see below message after you process the program (F8).
Now execute TCODE : SE16N to display the ZEMPLOYEE records.
Enter the Table’s name and click on the EXECUTE button.
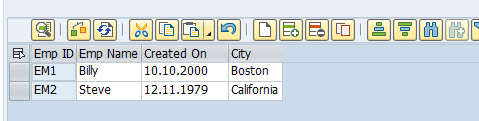
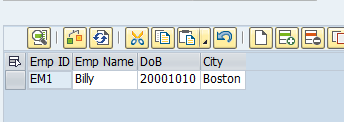
Here’s the result. We have successfully created 2 new records in our custom z table.
How To Read Entries From Transparent Table using ABAP
Okay now we want to read or make a query from that table and display it on your ABAP program.
To make a query we need to do some SQL or in ABAP we called it Open SQL.
Here’s the basic syntax.
SELECT <FIELDS> INTO TABLE <INTERNAL_TABLE>
FROM <TRANSPARENT_TABLE>
WHERE <CONDITION>.
The INTO TABLE statement will add all the entries into an internal table.
After performing the selection query, the next step is to display the retrieved data on your screen. To do this, we loop through the entries using a LOOP statement and use the WRITE statement to output the results.
Here’s an example code snippet to demonstrate this process
"SELECT all fields, all records"from custom table Zemployee and store it in IT_TEMP internal tableSELECT*INTO TABLE it_empFROM zemployee."Loop through the internal table and pass each line into wa_emp structure / line typeLOOP AT it_emp INTO wa_emp."display each record on your screen using the WRITE statementWRITE:/ 'Emp ID:', wa_emp-emp_id,'Emp Name:', wa_emp-emp_nm,'Birth Date:', wa_emp-birthdate,'City:', wa_emp-city.ENDLOOP.
TIPS: To remark the previous code you can block the entire block, and then press CTRL + , (comma), to un-remark CTRL + . (dot).
Block The Code
Press CTRL + , (comma)
Save, Activate and click on the processing button (F8) and here’s the result.
How To Update Entries in Transparent Table using ABAP
Here’s the basic syntax for updating the entries in your transparent table.
UPDATE <transparent_table_name>
  SET <field> = <new_value>
  WHERE <field> = <condition>.
Here’s an example of how to update the ZEMPLOYEE table to change the employee’s city from California to Sacramento for an employee with EMP_ID = ‘EM2’. To see the changes, select the entries again and display the output.
"Update the single recordUPDATE zemployeeSET city ='Sacramento'WHERE emp_id ='EM2'."Select all entriesSELECT*INTO TABLE it_empFROM zemployee."Display the new record, you will see the employee's city with EMP_ID = 'EM2'"has been changed from Californio to SacramentoLOOP AT it_emp INTO wa_emp.WRITE:/ 'Emp ID:', wa_emp-emp_id,'Emp Name:', wa_emp-emp_nm,'Birth Date:', wa_emp-birthdate,'City:', wa_emp-city.ENDLOOP.
Here’s the result, and as you can see the city for Steve (EM2) has been changed from California to Sacramento.
How To Delete Entries From Transparent Table using ABAP
Now to delete the table’s entries we will add some codes that would display a pop up window confirming the deletion and if the user select yes, then the deletion process continues, if not then the deletion process is cancelled.
  DELETE FROM <Transparent_table_name>
    WHERE <field_name> = <field_value>.
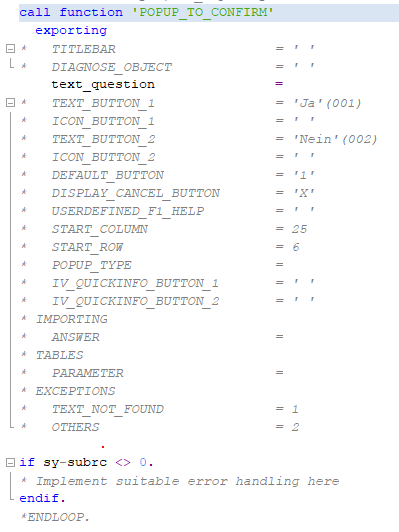
To show the confirmation pop up window, we will use SAP ABAP built-in function module which is called POPUP_TO_CONFIRM and then get the user decision’s input to determine the deletion process.
You can insert the the POPUP_TO_CONFIRM function module in your ABAP Program by clicking the Pattern button on the toolbar.
Then Enter: popup_to_confirm in the CALL FUNCTION field and then PRESS ENTER
Now the function name and all the function’s import and export parameters automatically inserted into your ABAP Program.
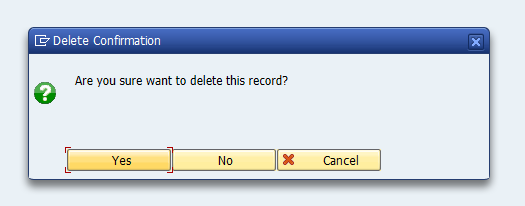
You will be prompted with a pop up window confirming the deletion process.
If you choose Yes then the record will be deleted.
The employee with ID ‘EM2’ has been deleted from the table ZEMPLOYEE.
The MODIFY Statement For UPSERT process (Update, Insert)
This last statement probably the most useful syntax for updating and inserting records into your transparent table because the MODIFY statement will overwrite / update the existing record (with the same ID) and insert a new one if the record has a new ID.
In below codes, you will see that we’re using the same MODIFY statement for updating and inserting records then ABAP will automatically checks for the entries, if the key already existed then it will update the record BUT new ID’s will trigger the INSERT statement.
wa_emp-emp_id ='EM1'.wa_emp-emp_nm ='Billy'.wa_emp-birthdate ='20001010'.wa_emp-city ='San Francisco'."This will update the existing record"Because EM1 already existedMODIFY zemployee FROM wa_emp.wa_emp-emp_id ='EM2'.wa_emp-emp_nm ='Merry'.wa_emp-birthdate ='19880920'.wa_emp-city ='Denver'."This will create new entry"Because EM2 does not exist yetMODIFY zemployee FROM wa_emp.SELECT*INTO TABLE it_empFROM zemployee."Loop through the internal table and pass each line into wa_emp structure / line typeLOOP AT it_emp INTO wa_emp."display each record on your screen using the WRITE statementWRITE:/ 'Emp ID:', wa_emp-emp_id,'Emp Name:', wa_emp-emp_nm,'Birth Date:', wa_emp-birthdate,'City:', wa_emp-city.ENDLOOP.
Now let’s check out the updated result.
Record with EMP ID: EM1, the city has been updated to San Francisco and record with a new EMP ID: EM2 has been created successfully also.
Samuel Indrajaya is the editor of ABAPGeeks.com, he is an experienced ABAP programmer with over 10 years of expertise in SAP development who loves helping others improve their ABAP skills and SAP knowledge
“Hello World” is like a magical phrase, marking the beginning of a journey into a new programming language and as the saying goes, “A journey of a thousand miles begins with a single step“, and for many of us, that single step in the world of ABAP programming was a simple “Hello World program”. So…
I was first introduced to ABAP programming language back in 2009, at a time when SAP was already well-established with its R/3 system and had recently shifted focus towards SAP NetWeaver. By then, ABAP had evolved far beyond its original procedural roots, and I was stepping into a world where object-oriented programming (OOP) was becoming the…
Like in any other programming languages, we use variables as containers for storing and managing data, allowing us to manipulate and process information throughout our code. In this tutorial, we’ll go over the basics of variable declaration in ABAP, explore different data types, and examine examples to help illustrate how these data types are used…
Internal tables are like temporary tables that you can define and use throughout your ABAP program, you can create internal tables based on structures from SAP standard tables, custom tables or even data types such as i (integer) or string. You can use internal tables to store and manipulate the records retrieved from SAP tables…
Tutorial Objectives 1. Learn how to use branches for decision making: IF..ELSEIF..ELSE and CASE..WHEN..ENDCASE. 2. Learn how to use loops with conditions: DO..ENDDO and WHILE..ENDWHILE. Prerequisites 1. SAP System Access: SAP GUI, ECC. 2. Authorization: Developer role, TCODE: SE38. Today you will learn about control structures in ABAP, which is the programming constructs that will…
Throughout our ABAP tutorials, sometimes I used a mockup tables in SAP called FLIGHT data model to create, read, update or delete records in the tables, and because it’s a mockup tables for testing purpose then you don’t need to worry about effecting any other tables in SAP. So What is FLIGHT Data Model? FLIGHT…